

Set of 10 tattoo machine washers
TATUAT.ROSpecifications
- Brand
- TATUAT.RO
- Weight
- 7 g
- Material
- Metal
- Dimensions
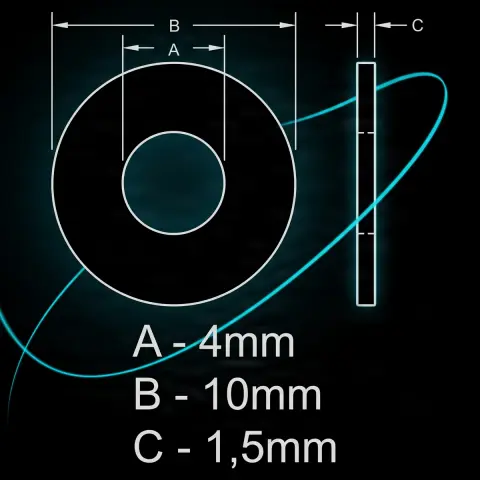
- 4 mm inner, 10 mm outer
- Thickness
- 0.3 mm
- Quantity
- 10 pcs
- Composition
- Stainless steel/Brass
Useful guides:Întreținerea mașinii de tatuatÎntreținerea mașinii de tatuat: piesele de schimb esențialeDe ce zăngăne sau vibrează anormal mașina de tatuat: cauze mecanice și remedii
Guide & full description
Complete guide: Set of 10 tattoo machine washers
A set of 10 flat metal washers, with an inner diameter of 4 mm, outer diameter of 10 mm, and thickness of 0.3 mm — the small parts without which a coil tattoo machine cannot be assembled correctly. They are intended for tattoo artists who service their own machines: they evenly distribute the tightening force of screws, protect metal surfaces from wear, and allow fine geometry adjustments. An inexpensive consumable that makes the difference between a stable machine and one with intermittent contacts or loosening screws.
How to use
- Identify the assembly points that require washers: under the screw heads securing the coils to the frame, between the armature bar and its support, at the contact spring attachment, and when mounting the terminals on the frame.
- Before installation, check each washer to be flat and free of deformations — a bent washer no longer distributes the tightening force evenly.
- Place the washer on the screw with the flat surface against the part it protects, then insert the screw into the housing.
- Tighten the screw firmly, but without excessive force — the role of the washer is precisely to distribute pressure, not to compensate for rough tightening.
- For fine adjustments of distance or geometry, you can stack two or more washers at the same point — a common technique on coil machines.
- At each service operation, inspect the existing washers and replace any that are deformed, thinned, or corroded with new ones from the set.
- Keep the remaining washers in the service kit, in a closed container, as spares for future interventions.
Tips from us
- Do not improvise with hardware store washers: those from general retail may have inconsistent thickness and flatness or finishes that degrade when in contact with studio disinfectants.
- At the electrical connection terminals, a clean and flat washer ensures uniform contact — if the machine has intermittent contacts, first check the condition of the terminal washers before looking for more complex faults.
- If a screw keeps loosening due to machine vibrations, check if the washer under its head is missing or deformed — it is one of the most common causes.
- Keep track of the washers when disassembling: take a photo of the assembly before taking it apart, so you can put them back exactly where they came from.
- The set of 10 pieces covers the complete service of a coil machine and leaves you with spares — but if you work on multiple machines, consider an additional set.
Frequently asked questions
Where exactly are the washers installed on a coil tattoo machine?▾
At several assembly points: under the screw heads that secure the coils to the frame, between the armature bar and its support, at the contact spring attachment, when mounting the terminals on the frame, and generally wherever a screw tightens two metal surfaces that need protection from direct metal-to-metal contact. A standard coil machine uses a few washers at various points, so the set of 10 covers the full assembly plus spares.
Do they fit any machine? What are the dimensions?▾
The washers have an inner diameter of 4 mm, outer diameter of 10 mm, and thickness of 0.3 mm — standard dimensions for conventional screws used in coil tattoo machine construction. For most service operations on standard coil machines, these dimensions cover the needs. Modern rotary machines typically use different assembly systems, so check the screw diameter of your machine before ordering; some classic construction rotaries may still use similar dimensions.
How do I know when a washer needs to be replaced?▾
Signs of wear are visible on simple inspection: the surface is no longer flat (the washer has deformed), the thickness has been reduced by repeated compression, surface corrosion has appeared, or marks and grooves left by the screw head are visible. A deformed washer no longer distributes the tightening force evenly, so check the condition of the washers at each service operation and replace them without hesitation — they are the cheapest component of the machine.
Can I use regular hardware store washers instead of these?▾
Technically it is possible if the dimensions match, but it is not recommended. General retail washers may have inconsistent thickness and flatness, materials that do not resist the disinfectants used in the studio, or finishes that degrade over time. On a tattoo machine, where vibrations and electrical contacts depend on calibrated parts, it is worth using washers with exact dimensions and materials compatible with the work environment.
How do I clean and store them?▾
The washers do not come into contact with the client's skin, so they do not require sterilization — but they are part of the machine that you disinfect after each session. The metal materials they are made of (stainless steel or brass, according to the manufacturer's description) resist standard studio disinfectants. Wipe them along with the machine, dry them completely to avoid corrosion, and keep the spares in a closed, dry container in the service kit.
Does it matter which side I install the washer on or how many I put in one point?▾
Flat washers are installed with the flat surface against the part being protected; being flat on both sides, orientation is not critical, but check that they are not deformed. Stacking two or more washers at the same point is a common adjustment technique on coil machines — used for fine-tuning distances and component geometry. The important thing is that all stacked washers are flat and clean, otherwise the tightening becomes unstable.
Product description
You might also like
Reviews
No reviews yet. Bought this product? Be the first to leave one.