

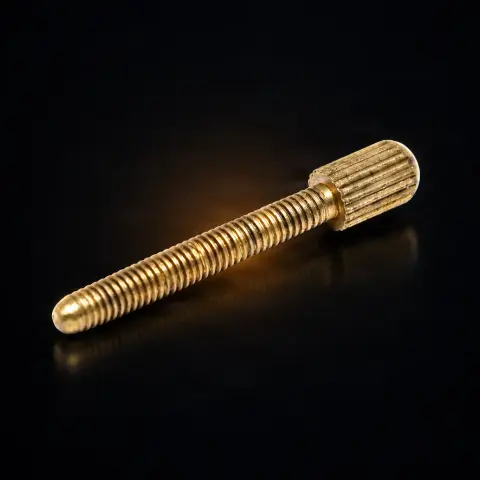
Contact screw Gold
TATUAT.ROSpecifications
- Brand
- TATUAT.RO
- Weight
- 3 g
- Length
- 33 mm
- Thickness
- 3.8 mm
- Material
- Brass
- Finish
- Gold
- Usage
- Tattoo machine adjustment
Useful guides:Întreținerea mașinii de tatuatÎntreținerea mașinii de tatuat: piesele de schimb esențialeDe ce zăngăne sau vibrează anormal mașina de tatuat: cauze mecanice și remedii
Presentation video
Guide & full description
Complete guide: Contact screw Gold
The gold contact screw is the central threaded adjustment piece for coil tattoo machines. Its position sets the distance between the front contact point and the contact spring, i.e., the exact parameter that determines the needle stroke, the armature bar oscillation speed, and the "character" of the machine. It is the component you adjust when you want to switch the machine from liner to shader or vice versa, and a useful spare part for any tattoo artist working with coils. It has a length of 33 mm and a thickness of 3.8 mm, and is made of brass with galvanic gold plating.
How to use
- Turn off the machine and disconnect it from the power supply before any intervention — only work on the unpowered machine.
- Unscrew the old contact screw from the frame and clean the thread of the housing of any residue or oxidation marks.
- Screw in the new gold contact screw to the starting position, without tightening it completely, so you have room for fine adjustment.
- Start the machine at low voltage and observe the contact between the screw tip and the contact spring.
- Adjust the contact distance: tightening (clockwise) reduces the distance and produces a shorter, faster stroke, suitable for lining; loosening (counterclockwise) increases the distance and gives a longer, slower stroke, suitable for shading.
- Make adjustments in small increments — a quarter turn or less — and test the machine's behavior after each change.
- Once you have found the desired setting, secure the position with the locking nut (if your machine has one), so the screw does not loosen during work.
Tips from us
- Always adjust in small steps and test after each adjustment — large changes at once make the setting hard to reproduce.
- Periodically clean the contact tip and thread with isopropyl alcohol and a small brush to maintain clean and consistent electrical contact.
- A minimal amount of oil on the thread prevents seizing and facilitates fine adjustment, but keep the oil away from the contact point to avoid creating an insulating film.
- Do not use abrasive materials for cleaning — they would damage the gold plating on the tip.
- Write down the settings that work for you for liner and shader, so you can recreate them quickly.
- Keep a spare contact screw in your kit — a worn part in the middle of a session can stop your work.
Frequently asked questions
What does the contact screw actually do?▾
It controls the opening distance of the electrical contact on the coil machine. By adjusting its position, you change the oscillation speed of the armature bar and, consequently, the stroke and behavior of the machine. It is the main tuning tool for a coil machine — its role is comparable to changing the cam on a rotary machine.
How do I adjust for lining vs. shading?▾
Tightening (clockwise) reduces the contact distance and gives a shorter, faster stroke with more "power", suitable for lining. Loosening (counterclockwise) increases the distance and gives a longer, slower, and gentler stroke, suitable for shading. Make adjustments in small increments, a quarter turn or less, and test after each.
Does it fit my coil machine?▾
The screw has standard dimensions and thread (length 33 mm, thickness 3.8 mm), compatible with most conventional coil machines. Some artisanal or boutique machines may use non-standard threads — if you have such a machine, check the thread before ordering.
How do I know it needs replacement?▾
Classic signs of wear: the contact tip visibly flattened or blunted, difficulty achieving stable adjustments (the machine goes out of adjustment by itself), damaged thread that no longer holds position, and loss of gold plating at the contact point (visible oxidation). A worn screw introduces variability and makes precise adjustment impossible.
How do I clean and maintain it?▾
Clean the contact tip and thread with isopropyl alcohol (usually 70%) and a small brush, removing carbon deposits, ink, and oxidation from the contact surface. Avoid abrasive materials that would damage the gold plating. You can put a fine drop of oil on the thread to prevent seizing, but do not let oil reach the contact point. Regular cleaning extends the life of the part.
Gold or silver — which should I choose?▾
Functionally, both serve the same role. The gold plating offers very good electrical conductivity and superior oxidation resistance (it does not form an insulating layer that degrades the contact), plus a low friction coefficient at the contact with the spring. The silver (nickel/chrome) variants, on the other hand, offer higher surface hardness. The choice depends on your priority: conductivity and oxidation resistance, or mechanical hardness.
Product description
You might also like
Reviews
No reviews yet. Bought this product? Be the first to leave one.